Making Dobos Torte I: Layers
There’s a fussiness to Dobos torte layers that’s annoying to some, a delight to others. If you’re the type that enjoys a couple of hours alone in the kitchen, carefully applying batter to sheets of foil and baking and trimming each one to perfection, this job is for you. If not, well, may I suggest a nice pie this weekend?
For as I mentioned previously, one of the things that gives Dobos torte its unique flavor — apart from other chocolate cakes or tortes — is its high crust-to-crumb ratio. It’s all the caramelized sugar, you see. The more layers, the more pronounced the flavor becomes. Which is why, instead of making the normal six or seven layers, I’ll do ten or twelve if I can spread the batter that thin. Oh, call me crazy if you want. Just taste the torte. Plus the slices of finished torte look amazing.
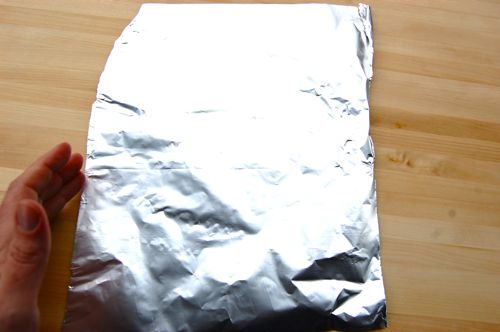
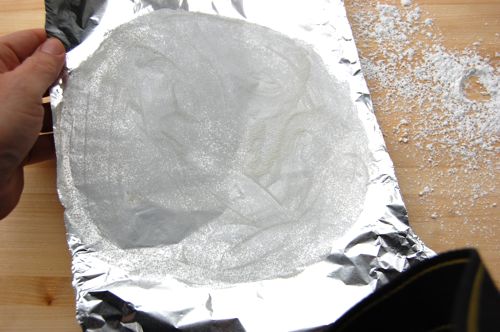
But I’m getting ahead of myself. Preheat your oven to 450. Begin by tearing off a piece of foil or parchment that’s at least ten inches wide. The shape doesn’t really matter, so long as your 9″ form fits on it. Why am I using foil? Because I only have a roll of parchment at home at the moment instead of the flat sheets, and rolled parchment likes to curl, and curling sheets will drive me crazy.
Lay down your plate, pot lid or cardboard cake circle and trace a circle with a pen or pencil (it doesn’t matter which, since you’ll turn the sheet over to apply the batter.
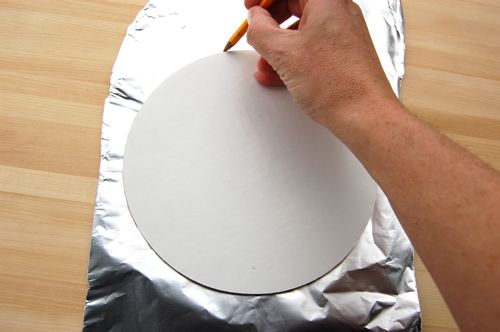
In the case of foil, the pencil leaves an impression you can see on the other side. With parchment, the line will show through.

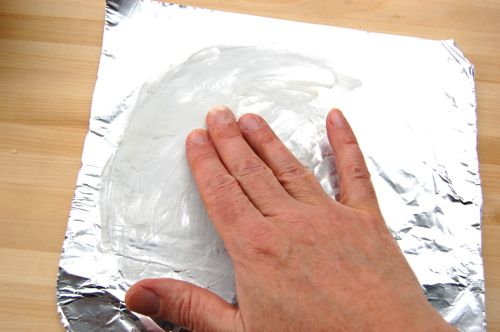
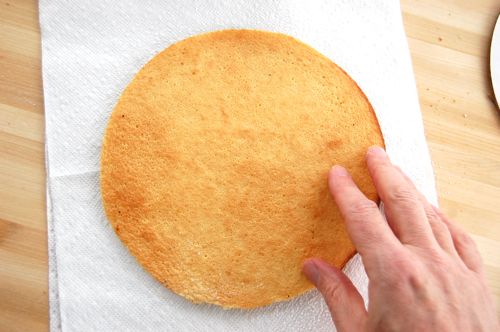
Turn the sheet over and lightly butter the area, buttering outside the line by half an inch or so.
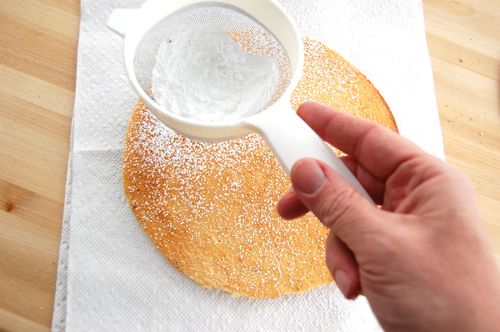
Sprinkle on some powdered sugar…
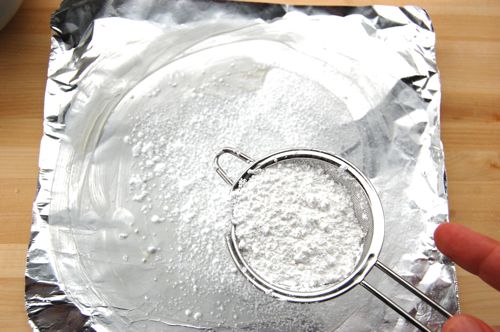
…and tap off the excess so you have only a film of sugar left. Do this seven-to-twelves times. See what I mean about needing counter space? Actually, once they’re sugared the sheets can be lightly stacked.
Now for the batter, which is a little adventure of its own (no wonder none of Dobos’ competitors could crack the formula — who would ever think to make a batter this way?). Start by sifting the flour and salt together and setting it aside. Put your room-temperature egg yolks in the bowl of a mixer fitted with the paddle.
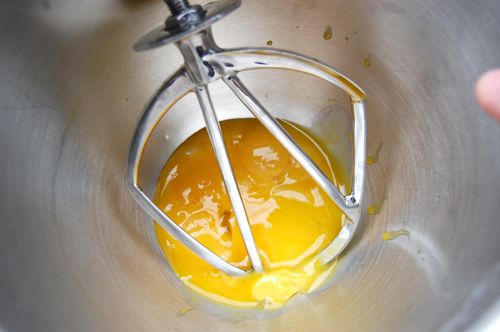
Beat them on high for a few minutes until they’re light in color and slightly bubbly. Turn the mixer down to low and add the sugar.
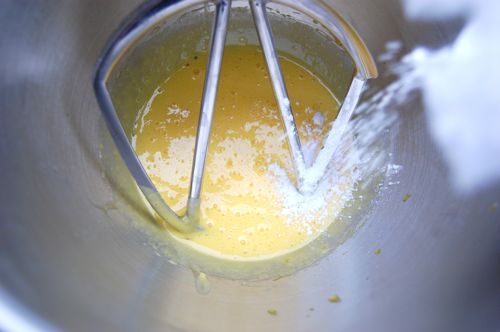
Turn the mixer back up to medium-high and beat for about five minutes until the mixture is light and voluminous and falls in a thick ribbon off the beater, about like so:
Lovely right? Enjoy it while you can because you’re about to ruin it. Scrape the bowl.
With the mixer on lower, add in the flour. Once it’s incorporated, turn the mixer up to medium-high and beat the mixture for another 3-5 minutes.
The result will alarm and sadden you, because suddenly your silky batter will take on the texture of wood putty.
Think I’m kidding?
Oh sure, you can add in your lemon juice at this point, hoping it will save you, but it won’t. Stir it on low, you’ll see.

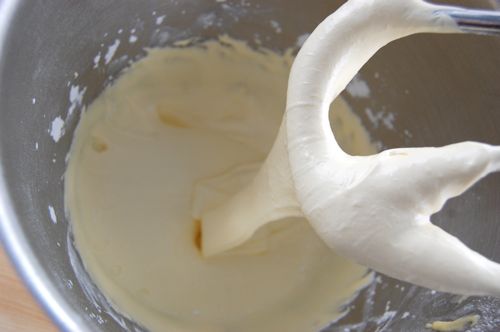
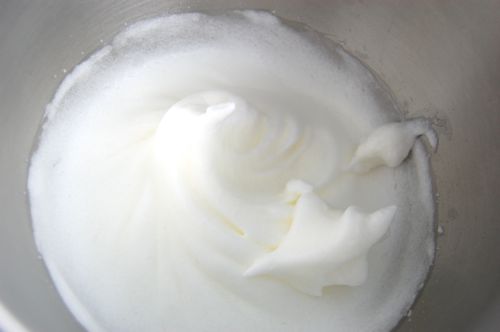
At this point you’re falling into despair because you have no idea how on earth you’re supposed to incorporate whipped egg whites into window caulk. You whip up your whites to stiff ( but not dry) peaks, wondering all the while if it’s not too late to make a nice easy pound cake instead.
Just for laughs, so you can say you did, you try to stir about three heaping spoonfuls of egg white into the putty.
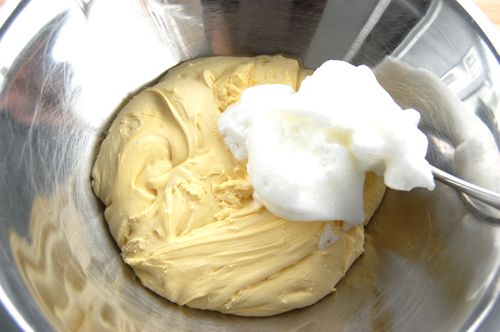
Puh. What a cruel joke! You stir for about three minutes…
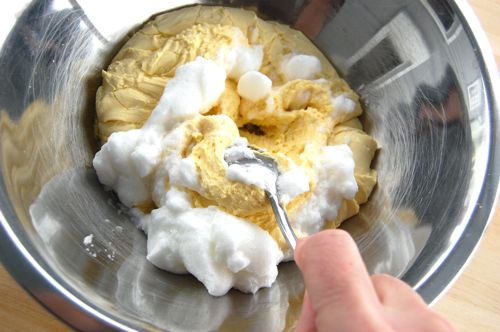
…until…miraculously…the batter starts to loosen to the point that you can actually start folding the rest of the whites in about a third at a go.
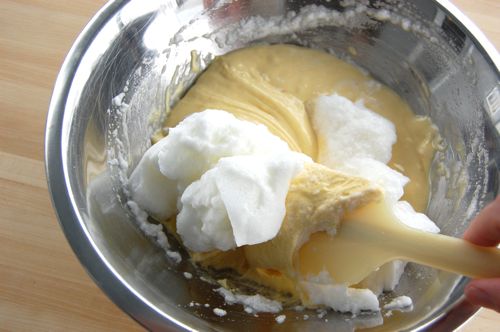
Who knew this stuff was cement five minutes ago? (Don’t feel like you have to incorporate every last bit of foam).

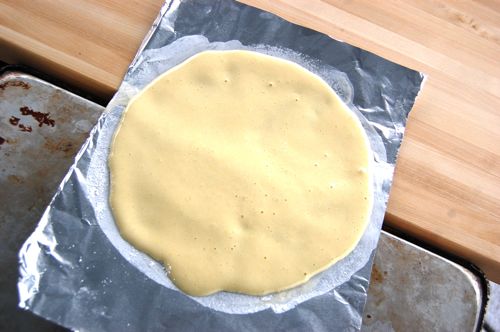
Now for the battering and baking. Keep in mind that I like very thin layers. The method below yields between 10 and twelve of them, but you can go thicker if you prefer. You want to apply three heaping spoonfuls of batter to a sheet (use six if you want only six or seven layers). The extra-yellow color his is a trick of the light.
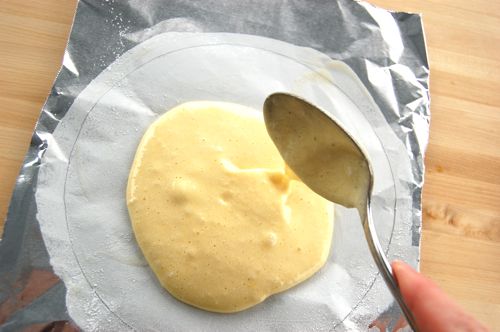
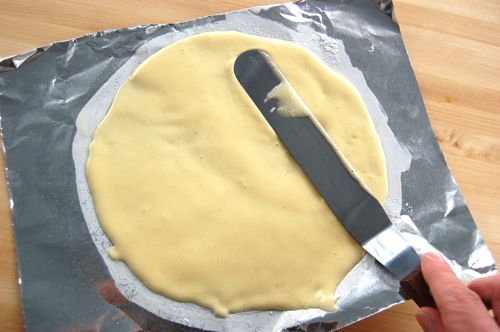
Now for the spreading. It’s not a tricky job, really. You just apply an offset icing spatula, gently scrape the batter toward the outer edge of the circle. Again you want to go a little outside the lines.
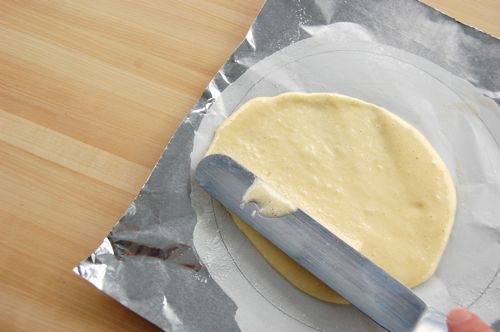
As you do this you want to slowly rotate the sheet with the other hand. Where is my other hand? Taking pictures, but I’ve rotated the sheet 90 degrees since the last frame.
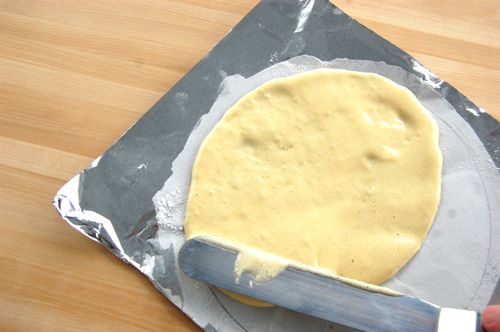
The result won’t be perfect, but it doesn’t need to be.
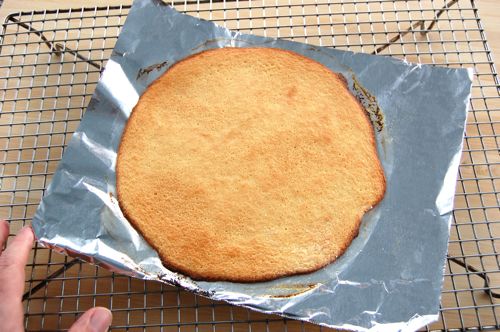
Slip the foil onto the back of a sheet pan, and the foil sheet onto a waiting rack (or pizza stone, even better) in the oven. You can put the whole pan in if you don’t feel comfortable with all the sliding. Set the timer for 4 minutes.
At the end of that time you’ll have something that looks about like this. Very nice. Now let it sit there for a couple of minutes (you can prepare another layer at this point, as a productive use of your time).
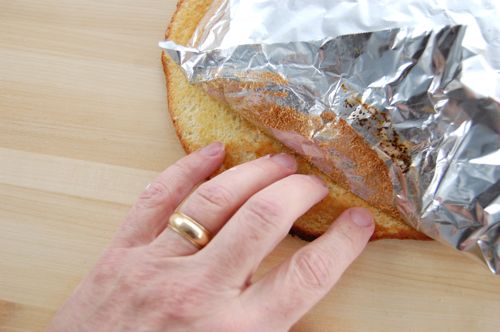
Now then, everyone who tries to get a Dobos layer to let go for the first time has the same initial reaction: it won’t release! It won’t release! Take a deep breath: it will. Just start hunting around the edge of the layer for a spot that wants to come loose. There’s one:
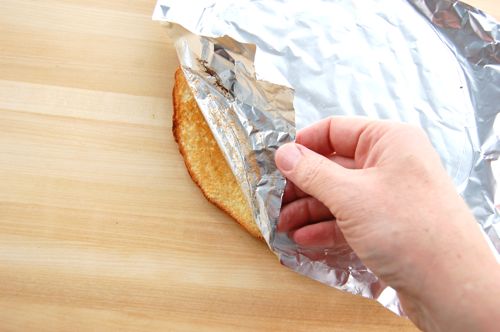
Now gently follow the edge around, lightly prying the caramelized batter away from the foil. These layers are almost tuile-like if you’ve made those before.
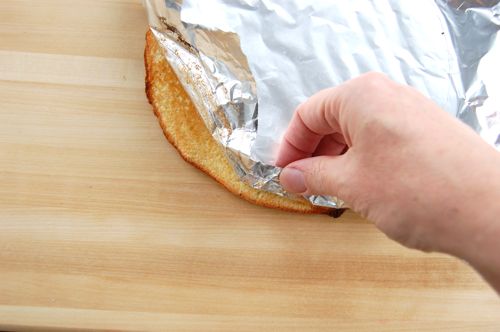
Use the other hand to gently hold the layer down and keep it from tearing…
…and before you know it, you’re done!
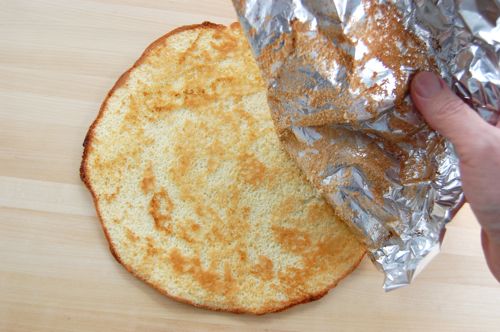
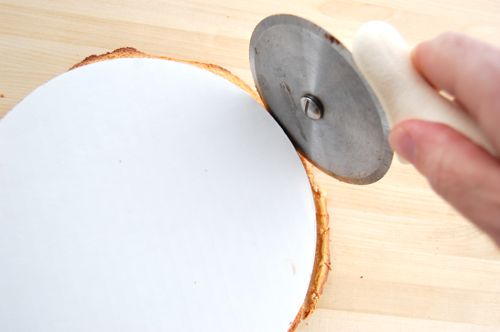
Now for the trim. Gently lay your original template down on top and trim around the layer with a pizza cutter. If it’s heavy, you’ll want to apply a little powdered sugar to the board and the template to keep the layer from sticking to either surface.
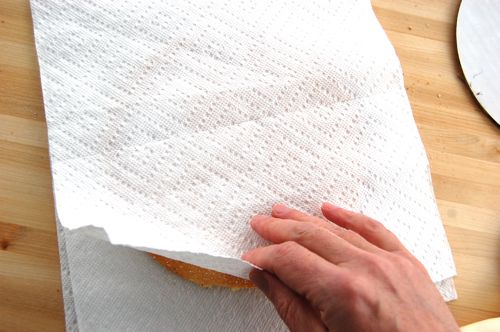
Once that’s done, dust a little powdered sugar on a paper towel…
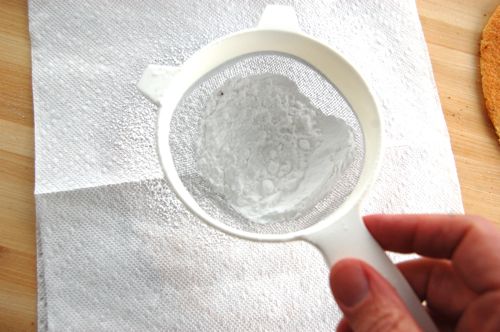
…lay down the layer…
…lightly dust it as well…
…and put down another layer of paper towel.
And continue! I got eleven layers using this method. Allow them all to cool completely before you assemble the torte. You can assemble immediately or later. If you’re going to wait more than an hour or so, put the stack in a garbage bag to prevent the layers from drying out. They can also be frozen for up to a few weeks.
Seem a little involved? It is, but once you get your system down you’ll spread, bake, trim and stack like a machine. Have fun!
Reynolds makes a product called release foil. I haven’t tried it since I haven’t needed it, but it’s supposed to be very non-stick.
Excellent idea! Thanks Ellen!
I have used Reynolds Release and it’s a great product. It would probably work for the Dobos layers pretty well
I love the Reynolds non stick foil, and I just tried using it instead of parchment for a thin foam cake layer. Part of the layer came free very easily and part stuck tenaciously.
Do you have any experience mass producing Dobos tortes? I’m one who loves to spend a couple hours baking in my kitchen but it seems like a lot of work for a professional kitchen, especially when making just four tortes would require at least 24 layers. Any shortcuts?
In fact I don’t. My feeling is that these days most Dobos torte is delivered in “strip” form (i.e. single portion rectangles), made from cake that’s been baked up in large sheet pans and simply stacked up. Somebody somewhere probably still does round ones, but I’ll bet they’re a rarity, even in Vienna or Budapest.
Re: How to prepare Dobos in larger volumes:
I have made many, many Dobos in my time in commercial kitchens. One of the pastry chefs I apprenticed under was from Vienna, trained in the classic pre-WW2 style. Through him, I learned some of the Viennese classics, among them, Dobos Torte.
We prepared our batter in batches that made 7 full-sheet parchment lined pans of thin dobos layers. Using 7 layers per cake, this gave us 6-8″ cakes per batch, IIRC. How much batter per pan? We scraped it out of the bowl using a plastic scraper. After a while, you knew how many scrapers “full” it took. Pan out all 7 pans before spreading the batter. Then eyeball the mounds to make sure they are more or less equal. Barring that, you could cheat and weigh them out on a scale 😉
Using an offset spatula, spread the batter evenly, filling the entire pan. Spread it too thin and it will brown in that spot. Browned = tough/hard/crispy. The layers should be tender throughout. Too thick and it will present an uneven layer when sliced. The ultimate goal in a good Dobos is to have perfectly even and equal layers of cake/buttercream. Needless to say, you need nice, even, straight pans for this job. Something that is in short supply in any professional bakery. We used to hoard the new ones 😉
Each 8″ layer was then cut out of the sheet using a knife and cardboard cake circle, bottom of a cake pan, or a metal torte ring, cutting them closely spaced so as to minimize waste. What little waste remained was used in the filling for “Punch Cake”, which contained cake scraps/crumbs, a bit of jam, and some rum. A classic Viennese pastry you don’t often see anymore.
Also, a couple of tips when making the caramel-topped layer:
1 – Adding a bit of lemon juice, or corn syrup will help prevent crystallization and seems to keep the caramel slightly soft for a longer period of time before it completely cools and crystallizes.
2 – Run the back of a serrated slicer (preferably longer than the diameter of the cake circle) lightly along a block/stick of butter. Do this for each pass described below. I used the back of a 10″ serrated slicer to create the indentations, then a chef’s knife for the actual cutting.
3 – After pouring and “teasing” the caramel into place, wait a few seconds for the caramel to set a bit, then gently press your knife onto the caramel, indenting the divisions (4 passes for a 8 “wedges”), without cutting completely through the layer. When done at the correct time, this will “thin” the caramel at that spot, allowing it to cut cleanly. Then, before the caramel has completely cooled, place your knife in the divisions, and press down with your other hand, cutting cleanly through in one press. If you wait too long, the caramel will shatter. Cut it too soon, and the caramel will not cut cleanly.
This entire Dobos-making process is a great test of timing and skill.
BTW Joe, your caramel topped wedges looked excellent! But do yourself a great favor, toss the rolled parchment paper, buy some flat 1/2 sheets,and retain your sanity 🙂
GREAT information, Pentooll! Thank you for taking the time to submit it. But yes, I’ve since restocked my pantry with flat sheets of parchment and I’m generally a much happier person. Cheers, – Joe
What great fun to watch someone else torture themselves for the sake of a great recipe! I make Filipino-style cake sans rival with cashew nuts when I’m feeling particularly masochistic. Your technique here would work very well for this annoying, but delicious, cake. Many thanks for the detailed step-by-step.
Hurray! COMMENTS! now i can bug you even more 🙂
Another cake-thing i have wanted to bake. GREAT JOB
Wow, that is one freaky mixing method for sponge cake. Any ideas as to why/how that came into use?
No idea at all. I’ve encountered something like it before, an Italian cookie that I might make sometime soon, but that’s the only time. All I can say is that Europeans have been at this baking thing for a very long time, and have evolved some very unusual methods.
I’ve only tried making a Dobos Torte once, and it definitely didn’t look as neat and tidy as yours! Definitely love the great step-by-steps!
Thanks Peggy! I’ll get it finished up soon, promise!
whta are you supposed to put in between layers???
You shall see!
Hi Heidi!
Madeleines are considered little cakes rather than cookies, so they’re supposed to be soft. They firm as they stale,of course, but that only makes them better for dunking! It sounds like yours came out just right.
I love your site, Joe! Keep it up!
Thanks Don!
Joe,
I love this method for the torte. Do you think I would be able to apply this same method when attempting to make my Doberge Cake? I have vowed to make a decent Doberge this year… even if it kills me. 🙂
I don’t see why not. You’ll have to judge the timing for yourself depending on the cake batter you use, but it should work just fine.
italiensk catering Not bad! Keep it up dude.
Thanks, I will!
The recipe looks amazing, and was very entertaining (and helpful) to read. After reading this post, I definitely will be making a Dobos torte soon.
I would love to see a picture of the finished product!
That’s coming tomorrow!
Thanks! Your posts great!!
Hi Joe,
A question about the construction of the torte: why use foil (or parchment at all?) It seems like a pair of cake pans with carefully cut parchment circles could do the job as well , and that way you wouldn’t have to worry about trimming perfect circles, etc.
Thanks,
Evan
True enough, though you’d still need to make several cake pan liners out of parchment or foil since you’ll get some sticking. But for thicker layers, a cake pan might make some sense. For very thin ones, the method I put up is still the best, I think, since spreading an ultra-thin layer of cake batter around the bottom of a cake pan would be a very difficult job.
Joe-
Thanks for the recipe! How did you get your layers so even? I tried this over the weekend, and all of mine burned around the edges and stuck to the foil in the middle. The burned parts still tasted great, but I lost a couple layers when the middles stayed on the aluminum foil. The final product was definitely a hit, though!
It took some practice, Kyle! The main thing is to try to defeat the tendency we all have to heap up batter in the middle of the layer. Scrape more out to the edges without fear. Also, lower your oven a bit because it sounds like it’s running hot. That will help! – Joe
My family and I are so excited that we came across your step by step instructions! My grandma used to get the cakes every year for Christmas and various parties. They were round and thick and absolutely delicious. The woman who made and sold the cakes passed away about ten years ago and left no trace of her recipe!!! We are delighted to see something so similar and will try to make it as soon as possible!
Thanks for the details!
Please let me know how it turns out, Joanne!
I’m very happy to have you aboard! 😉
– Joe
We used to get our Dobos at Lichtmann’s Bakery in NY. Unfortunately, Mr. Lichtmann retired and seems to have taken his cake recipe with him since his children didn’t reopen the bakery. His layers were crisp rather than spongy and they were perfect with the mocha filling. How do I achieve that texture? Thin sponge cake is too soft!
Interesting. Were they meringue do you think? That would explain it . Maybe a nut meringue?
– Joe
Hi Joe! Four minutes on a pizza stone … Doesn’t get quicker than that! Gonna give this a go! Jules in Oz
Nice, Julie!
Thanks for the great idea!
– Joe