Product Review: The Brod & Taylor Folding Proofer
As home cooks and bakers get more sophisticated, they’re becoming increasingly frustrated by the limitations of their standard array of kitchen appliances, i.e. the contemporary quartet of refrigerator, freezer, oven and microwave. They see the results professional culinarians get from subtle manipulations of temperature and they want the same thing at home. Up until very recently, the vast majority of us have been completely out of luck on that front.
When affordable sous vide cookers came along about two years ago, all that started to change. Able to hold temperatures of 100-190 degrees Fahrenheit to within half a degree, sous vide water ovens allowed home chefs to effortlessly turn out steaks and chops that rival the very best restaurants can deliver. I snapped up one of those just about as soon as they came out, and I’ve loved it. However I’ve found precious few applications for it in the sphere of bread and pastry, mostly because everything inserted into it must be vacuum-packed in a plastic bag.
Where’s a low-heat gizmo that bakers can love? I caught myself wondering from time to time these past eighteen months. Then it showed up on my front porch: the Brod & Taylor Folding Proofer. About six weeks ago the good folks at Brod & Taylor got in touch via email to ask me if I’d review one. At the time I thought: eh, sort of a cool idea. After all, home bakers — especially yeast bakers — are forever trying to improvise their own proofing cabinets: plastic bags, low-heat ovens, microwaves with teacups full of boiling water. None of them work especially well or consistently. A home proof box — especially a folding one — could be a reasonably cool thing.
Then I got it and started playing with it. I realized it could do quite a bit more than raise my brioche in a timely manner. It was a full-on baking nerd machine if the highest order. Yes, certainly it’s a bread proofer, but then so is a bread machine. This box is a multi-purpose starter grower, dairy fermenter and chocolate temperer. Ah sweet mystery of life, at last I found you. Here’s what it looks like:

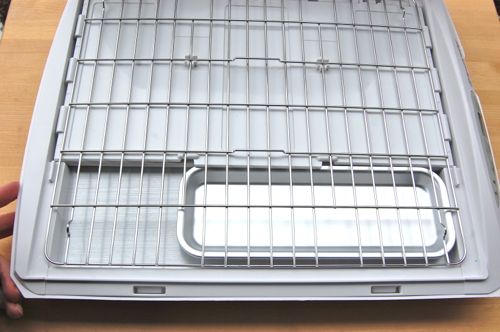
Collapsed it’s about the size of a briefcase, roughly 18″ x 14″ x 3″. Open this baby up and you can see the pieces-parts inside. Basically what you do is remove the grate and the little water dish…
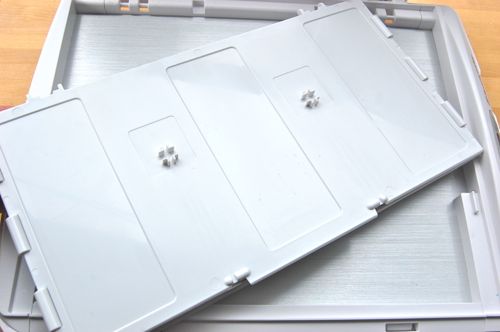
…un-clip the box section from the base…
…open the box section…
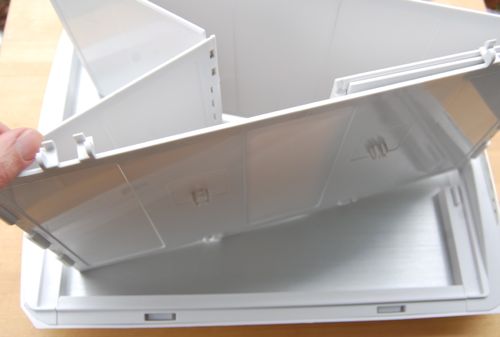
…then stand it up on the base. All you do then is replace the little water dish (with water if you need humidity) and the grate…

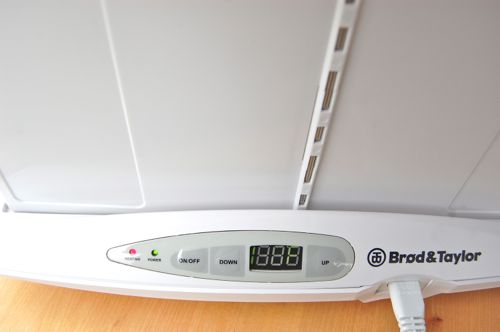
…put the top on and you’re ready. Overall the box is about 11″ high with the lid. The controls are perfect for an idiot such as myself. On/off, up/down, power/no power…you get the idea. The machine can be set for anywhere between 70 and 120 degrees Fahrenhiet (21-49 C).
When you’re all done you fold the proofer back down again and it’s ready to store. Very cool.

The collapsible engineering, it occurred to me the first time I used it, is really the key to this entire device. I mean, who wants another big box sitting on their counter or on a closet or basement floor? That the designers recognized this early on speaks well of them, for even frequent bakers don’t need something like this within arm’s reach all the time.
So what did I do with this in the Joe Pastry test run? The first thing I tried was some yogurt, which is something the whole family enjoys but which we long ago gave up making on our own. The heating pad technique is difficult and I never wanted to own one of those one-trick-pony yogurt makers. That went so well I made some crème fraîche (high-fat sour cream made from heavy cream) the same afternoon. (I’m something of a fermented dairy geek if you didn’t know that already…check the components menu under “dairy” if you want to see for yourself).
After that I used it to grow some starter for a large batch of bread, and let me tell you, at 110 degrees and high humidity, starter grows about twice as fast as it normally does on my countertop, especially in February. Very convenient for me, since I generally procrastinate on growing my starter until a day or two before I hope to bake. My sleepy starter generally takes a day to get motivated, then I’m really under the gun to bulk it up in time. This time I was all done in one day.
Next was the chocolate tempering test. I confess I harbor something of a fantasy: to be able to create flowing, tempered chocolate without having to go through the heating/seeding/cooling/warming process. Harold McGee theorizes such a thing is possible, provided the chocolate can be melted at a perfect 89-90 degrees. I’ve tried it twice with my sous vide cooker and once now with the folding proofer, but the best I could do was get the chocolate soft, not pourable.
Oh well. That aside, the folding proofer worked almost perfectly with a traditional seeding method. I confess there were a couple moments of anxiety, since the proofer, being relatively small, loses most of its heat as soon as the top is removed. The other side of the coin is that it recovers fairly quickly. And while it was hard for me to calibrate the proofer with any degree of accuracy, judging by the performance of the chocolate, it seems to do a good job of maintaining a steady 90 degrees (at least with the lid closed). Good enough for those of us who only do incidental chocolate work to get a Sacher torte or a batch of truffles done.
But while it’s a serviceable temperer, the sweet spot of this machine is clearly growing microbes. Regular bakers, quite honestly, will find this box a godsend. Friday evenings I generally make my Chicago-style pizza. I’m usually successful at setting aside 75 minutes for rising, but this last Friday I worked too late. Ah! I have a proofer! I suddenly remembered. I pulled it out, set it up and the dough was ready in 40 minutes. Nice, nice, NICE!
For me the only real drawback to this machine is its size. Coming from a commercial bakery background, I generally like to do things on half sheet pans, especially things like croissants which I don’t like to transfer once I’ve proofed them. I also bake more than two 2-pound loaves of bread, which is pretty much the capacity of this device. However for most home bakers, who only bake a couple loaves of bread and/or proof only a handful of pain au chocolate for an afternoon snack, the size is more than adequate.
At just under $150, it’s a very reasonably-priced item. Maybe not for the occasional baker, but definitely for the habitual one. And it’s a whole lot cheaper than the proofing drawer/warming drawer appliances I’ve seen in custom kitchen installations. Those things pretty much never get used. But that gives me another idea about how I’ll be using this thing come Thanksgiving: to keep my parker house rolls and green bean casserole warm while I make the gravy. Because I’m not giving this thing back. Nope, you can forget about that.
I was lucky enough to be one of the product testers on this item. I primarily use it on my whole wheat bread and I concur with your statement that it is especially amazing in February (or anytime in the winter in cold climates). And the folding size is great to tuck along the side of my counter when not in use!
I’m lucky enough to have an oven that will sit quite happily at 40°C so I can proof in there if I need to. And although I’ve used the oven for making yoghurt, a 1 litre wide mouthed vacuum flask is a lot cheaper to run.
wow! makes yoghurt sells it for me.
Boy, I sure wish one of those would appear on my front porch. ;> (Actually, there’s nothing like an overheated NYC apartment for proofing bread in mid-February.)
But a serious question now: since the latest fad in bread baking is the no-knead, long proofing process in order to get maximum flavor, how does a proofer like this (or any other proofer, for that matter) influence the bread’s flavor? How do these two different (even opposing) methods compare one against the other?
Thanks for the review, I’m already mentally rearranging my cabinet space.
Could they start work on a home bread slicer to round out the needs of the home baker?
I’ll put in a request! 😉
– Joe
These work well for bread – only one slice at a time, but then they’re good for meat too.
http://www.sunbeam.com.au/products/kitchen/es9600/
Thanks, Bronwyn!
I am an experienced yogurt maker/eater using the heating pad method. Now I need to learn the crème fraîche method!
It’s much easier than yogurt. All you need to do is sour a little heavy cream with a spoonful of yogurt or buttermilk. Let it ferment to the point it thickens and you’re done! (It’s on the site under “dairy” if you’d like something more concrete than that). Have fun!
– Joe
I dunno, a “splorp” sounds a little too technical for me, a simple country boy. 😉
I’ve spent a fair amount of time in food labs, which is where I picked up all the fancy talk. It’s my fault for trying to show off and talk over peoples’ heads.
I’m in SoCal so I never have to deal with really low temperatures. I mean we get cold here but nothing I wouldn’t feel good about proofing dough in. Of course, I want my doughs to proof as slowly as possible so I never want a warm environment rushing them.
In any case, I have found that, in addition to resting meat and keeping dough safe from the dogs (who see no reason to actually bake dough in the first place), my microwave is a great insulated proofing box. I just have a sign that I put over the controls to alert everyone that it’s out of commission.
Whatever works! A lot of people employ that solution, and for some folks it really works. I never had much luck with it, but as I mentioned, there are all sorts of improved proof box solutions out there. Some people swear by them and wouldn’t use anything else. Being a gizmo-geek, I like a think I can set and forget about…but that’s just me!
Thanks for the note, Rainey!
– Joe
Something to try for chocolate.
Take about 2/3 or 3/4 of the amount of chocolate you want to use and pop it in the machine at 113F (45C). The chocolate should melt nicely but it will un-temper (or is that “distemper?”). When it’s all melted, drop the temperature setting to 91F (32.5C). When it is at about 98.6F (37C, i.e. body temperature) dump in the rest of the chocolate. The liquid choclate will have enough residual heat to melt the new chocolate, and the new chocolate will re-temper the liquid.
This will work best with mini-pistoles or if you chop up your chocolate first.
FYI: Drop temperatures by 2F for milk chocolate and another 2F for white.
Fabulous, Paul. Thanks so much for this. I’ll try it this week!
– Joe
OOPS
“FYI: Drop temperatures by 2F for milk chocolate and another 2F for white. ” should read “FYI: Drop temperatures by 2C for milk chocolate and another 2C for white.”
Thanks, Paul!
A wonderful review that has gotten me thinking. I am interested in buying both the proofer and a sous vide machine. My budget won’t support both, so i am wondering whether you think that the proofer could be jerry-rigged to be used as a sous vide machine as well….
Thanks for listening
Hey Ina!
That’s a very interesting question. Honestly I’m not sure, but my gut feeling is that a proofer, being designed to warm air, wouldn’t do nearly as well with regulating the temperature of a medium as dense as water. It certainly wouldn’t do it very quickly, and that might put you in some danger where meats are concerned. These proofers really aren’t very expensive. So my suggestion is to buy the sous vide machine first since you’ll use it more, then start saving your change for the proofer. That’s how I’d do it anyway!
– Joe
Hi
I am a home bread maker in Asia-Malaysia, kindly recommend a dealer to buy this proofer.
Hi Amanda!
I don’t know of a distributor where you live, but this is the company right here: http://brodandtaylor.com
They can probably tell you where to get one!
– Joe
I cannot get the temperature in my bord and Taylor above 117 degrees and it doesn’t stay there, it drops and then struggles to get back up to 117. Plus it takes quite q while to reach the 117 degrees. I had no reason to test this until I had two batches of yogurt that just wouldn’t set up. I hadn’t tested tested this before and now believe my one hour at 120 was probably more like 40 minutes at anywhere from 115 to 117. The lower temp settings are pretty much right on. It took over 12 hours for my yogurt and it was very thin. For bread proofing this unit is great but I’d like to hear more about using it for yogurt making.
Huh. That’s a frustration. Now I need to go and test mine I think!
Thanks, Judy!
– Joe
I have been very successfully been making gallons of yogurt at 98 degees and lower for lack of having such a glorious proofer. Water bath in a cooler, crockpot set to the warm setting combined with a meticulously set .5 hour timer, fish aquarium heater! Oh yeah this proofer has been in my yogurt dreams long before i knew it existed.
If your yogurt is that thin at that temp my question is do you heat the milk to 185 to rid competing cultures before adding only 1 teaspoon starter yogurt per quart of now cooled previously scalded milk?
Very interesting. Thanks, Laura!
– Joe
Laura, I heat the milk to 190 degrees and hold for 10 minutes at that temp before cooling, as recommended in the Brod and Taylor instructions for “thick yogurt” .
Judy
I have resolved my problem with making yogurt in the Brod & Taylor Proofer. 1. I preheat the proofer to the 120 degrees. I do bring the temperature of my milk to 190 degrees and hold it there for a minimum of 10 minutes. I let it cool to 110 -115 degrees then add my culture, which is from plain organic yogurt purchased at the store. I then pour my milk with added culture into jars, loosly cover and move to proofer. After one hour I turn the temperature down to 88 degrees (86 degrees is recommended but through testing I found I could maintain 86 degrees with a setting of 88 degrees). I wait about nine hours and I then have wonderful, fresh tasting yogurt! I believe my biggest problem at first was the instructions to start checking your yogurt for doneness after two hours. This isn’t nearly enough time, and prompted me to remove the yogurt at the first hint of thickening. I Ofcourse wound up with soupy yogurt. Check your proofer temps and make sure you give your yogurt plenty of time. The results are wonderful!
Thanks, Judy!
– Joe
Have one of these and absolutely love it. A little note on why your yogurt may be taking so long. Not sure where I finally read this, but you need to put lids on the jars before you put in the proofer. It keeps the heat better. So I use mason jars with lids. Make about 6 quarts at once, and it takes about 2.5 hours. I use a pretty strong culture that I bought from Culture for Health. The Bulgarian culture, which is absolutely delicious.
Nice tip, Janice! Thanks!
– Joe