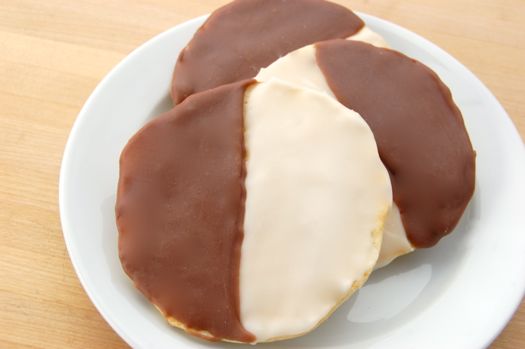
Black and Whites: Second Try

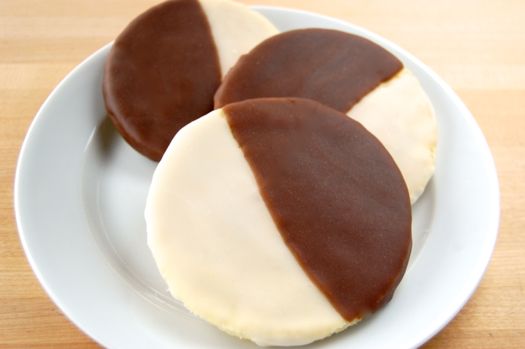
There we go. Now that looks more like something you’d see in a Manhattan pastry case, no? Forgive me but I couldn’t leave these alone until I’d gotten a little closer to the ideal. Actually this was my fourth try, as it took three attempts to get the cake where I wanted it. This last pass was all about finishing. What did I do differently? For starters I trimmed the cookies perfectly round with a round cutter after they cooled, like so (four inches worked perfectly for most of them).

READ ON

Making Black and Whites

Repeat after me: black and whites are cakes, black and whites are cakes, black and whites are cakes. Got that? Whew! Now maybe the New Yorkers will get off my back and let me eat my cookies in peace!

These aren’t difficult once you have the fondant in hand, and I do recommend making actual poured fondant since the effect is much creamier than with simple sugar-and-water icing. Something about the way the smooth fondant melds together with the hint of lemon in the cake…it really makes these. Indeed the classic versions are much more interesting than the newfangled jobs made with real chocolate coatings or rich frostings. These, in my opinion, are the Cadillacs.

READ ON

Black and Whites Recipe

Black and whites are flat cakes, not cookies, though they tend to be a little firmer and less rich than actual pieces of layer cake, which would tend to fall apart during the icing step and when they’re handled generally. These should be right in the zone I’m after, but as with all early-week recipes, let me try this before you do. You’ll need:

5 ounces (1 1/4 cups) cake flour
6.25 ounces (1 1/4 cups) all-purpose flour
1/2 teaspoon baking powder
1/4 teaspoons salt
zest of half a lemon
5 ounces (10 tablespoons) butter, softened
7 ounces (1 cup) sugar
2 eggs, room temperature
2/3 cup milk, room temperature
1/2 teaspoon vanilla
Poured fondant and chocolate poured fondant for icing

READ ON

Making Atole

Vacation is no excuse not to put up at least the odd post, right? We made a little atole at Chez Pastry before we left, and a delightful refreshment it is too, especially on a cold winter day. It’s a simple Mexican concoction of sweetened, spiced milk thickened with corn starch. As with all things that call for only a few ingredients, the higher quality the ingredients, the better the end product.

READ ON

Making Rice Pudding

Americans often have a tough time making rice pudding since our long grain rice tends not to bake up well when it’s added to custard in its raw state. The solution: make rice pudding with cooked rice. The result is every bit as delicious, plus it’s convenient if you order out a lot of Chinese food. The individual rice grains tend to maintain their integrity at bit more — i.e. are a bit chewier — but I like the contrast. Here I should note that everyone has their own favorite version from childhood. I’m not putting this forward as the standard by which all rice puddings should be judged. It happens to be one I like.

READ ON

Rice Pudding Recipe

Like all custards rice pudding can be either stirred (made on the stovetop in a saucepan) or still (baked in a dish in the oven). Personally I like a baked rice pudding since you get a greater variety of textures: a browned top, moist center, firm sides…oh yes much more interesting than a typical stirred pudding. The recipe goes like this:

2 eggs
12 ounces (1 1/2 cups) whole milk
1 teaspoon vanilla
1/4 teaspoon salt
3.5 ounces (1/2 cup) sugar
1/2 teaspoon ground nutmeg
1 teaspoon grated lemon or orange zest (optional)
7.5 ounces (1 1/2 cups) cooked rice
2.5 ounces (1/2 cup) raisins
cinnamon for dusting

READ ON

Making Palmiers

Under normal store-bought pastry circumstances palmiers are a very nice way to use up extra dough. When that dough is homemade, however, palmiers are poem-worthy. No other cookie is as light and lovely and delicious. Even “failed” puff pastry can find a welcome home in these delights. You can use whatever quantity of leftover dough you have. Roll it out into a rectangular sheet.

READ ON

Making Madeleines

The European pastry style must be rubbing off on me, because I’m becoming a sucker for ultra-simple treats like Madeleines. Crunchy and caramelly on the outside, soft and creamy on the inside and sweet, rich and lemony all over, these are the sorts of things I’m finding increasingly addicting as I evolve as a baker.

That said, I confess that making archetypal goodies like Madeleines always makes me nervous. They’re like chocolate cup cookies: a universal favorite, yet something everyone likes in just their own way. Which means making them here on the blog is something of a risky venture. For every person who likes their Madeleines the way I make them, there’ll be someone else who’ll consider them an affront to all that’s good and holy. But what are you gonna do. Let’s hit it!

READ ON

Madeleines Recipe

Madeleines have a reputation for being rather fussy things, and I suppose that reputation is deserved to some extent. However where small cakes are concerned, you’re always in good hands with Maida Heatter. Here’s her recipe slightly altered to reflect some of my ingrained habits.

about 1 cup bread crumbs, ground finely in a food processor
2 ounces (1/2 stick) unsalted butter
1 egg pus two egg yolks, room temperature
1.75 ounces (1/4 cup) sugar
1/2 teaspoon vanilla extract
2.5 ounces (1/2 cup) all-purpose flour
zest of one lemon

READ ON

Making Panforte

There are two kinds of panforte, “white” and “black.” White generally has more dried fruit in it, and is usually dusted with powdered sugar. The black version is generally spicier, nuttier and calls for cocoa powder (a novelty back when these cakes/candies first became popular). This panforte, quite frankly, is somewhere in between. But then why should I adhere to tradition when so few Italians do? Go to Italy and you’ll find hundreds of variations on the theme. For ideas on how to vary yours, refer to the recipe below. Begin by preheating your oven to 325 degrees Fahrenheit and roughly chopping the dried fruits and nuts:

READ ON