How to Assemble a Pastry Bag
Trained pastry chefs are taught elaborate techniques for fashioning pastry bags out of folded paper. I admire that, but I also have things to do and places to go. So when I need to do a little piping, say of jam into a doughnut, I go the pre-fab route. The basic components, tips and couplers, can be had at many specialty shops. As for the bags, not being a decorating professional, I vastly prefer the cheapie pre-made plastic versions over the real fabric bags. You can also use Ziploc bags if you want, though I’ll warn you now that those things tend to pop open at inopportune moments.
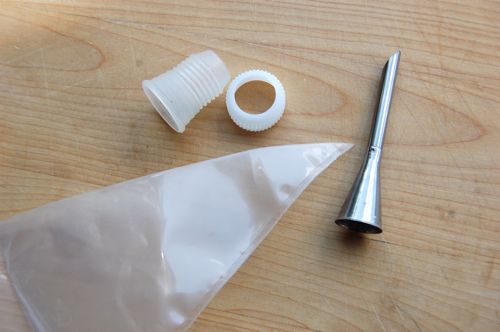
Experienced pastry people out there will probably say the process of putting together a pastry bag is obvious. That may be true, but obviousness didn’t prevent me from spending a bewildering hour fiddling with the pieces the first time I tried it. So for those who might be a little intimidated, I offer this short tutorial. Start with a tip of your choice, here a monster #230 for filling doughnuts, plus a two-part coupler and a bag.

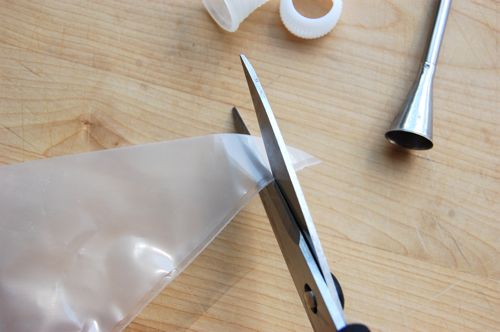
Hey wait! That bag doesn’t have a hole in it! See what I mean? The process isn’t intuitive at all! You have to snip the end off with scissors. How much depends on the size of the coupler. You may need to experiment a little, but the idea is you want a snug fit for the coupler. Trim off about three quarters of an inch:

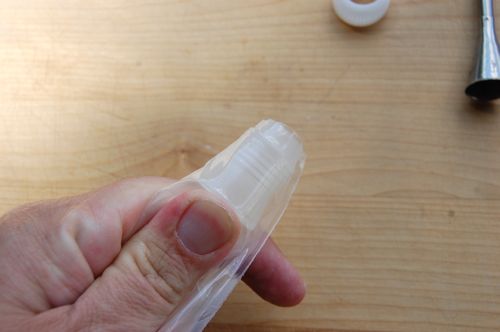
Then insert the coupler into the bag and push it toward the hole you made. You don’t want it to protrude out of the hole, since the idea is to pinch the bag between the base and the collar. Push it in tightly. Ideally, you’ll stretch the plastic a bit so it’s tight over the coupler’s threads.

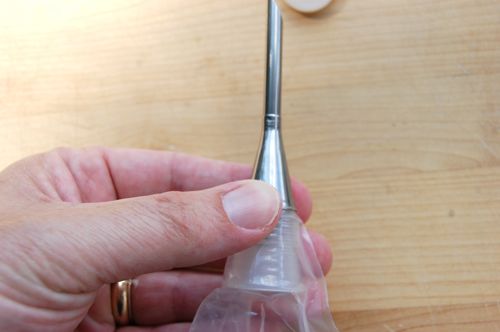
Once the base is in place, put the tip on…

…then the collar, and just screw it down.

You’re done! Wasn’t that obvious? No, in fact it really wasn’t.
These instructions are great. They are right on. They are easy to understand and follow. I followed them and was able to use my piping bag. Thanks a lot.
Glad to hear it, Sara. Thanks for the note. Cake decorators and pastry makers tend to take piping bag assembly for granted, but it’s not particularly intuitive I don’t think. Glad the instructions worked for you.
Merry Christmas!
– Joe
Thanks so much for these directions!! I was having heaps of trouble. My cakes no longer look naked. 🙂
Nothing worse than a naked cake! Glad the directions helped, Rae!
– Joe
Now I can go and buy that piping bag without the worry of never being able to make it work! Thanks. Just the info I needed. =P
Thanks for this! I had two sets of piping bags together, but since I’d never used them, I couldn’t tell what went together properly.
I need to use a double pastry bag and see them all over the internet, however, I do not know how to attach them to a coupler. Do you need a special coupler?
Hey Cathy!
You can go either way with those, I believe. You can funnel both sides through a single round tip or insert a split tip, which is the same process as a regular tip, except there are two half-moon-shaped nozzles, one of which goes in each side.
Does that make sense?
– Joe
Thank you so much! I totally messed it up and put the coupler thing on the OUTSIDE of the pastry bag, pulled the bag through the end of the coupler, then cut the end of the bag off, cut slits on the side and folded the bag back and then screwed on the tip and the other part. Confused? So was I! All that to try to make a ruffle smash cake ~ I was ready to smash it all right, to smithereens. The photos were very helpful. Again, heartfelt thanks….now, the frosting consistency 🙂
Hey Julie!
I used to do the same thing. Once you make up a pastry bag a time or two it gets to be second nature, but until then it can be confusing as all get-out. Glad the post helped!
– Joe
I wanted to pipe clay on to a sculpture and when I brought the parts home, I had no idea how to put them together. Thank you for the easy instructions.
My pleasure, Valerie!
Thanks for writing in and have a Merry Christmas.
– Joe